Finding the IP address of a module
Here we provide some tips to help find the IP address of an instrument (e.g. a Pulsar QCM or QRM).
Tip
When changing the IP address of the instrument, put a label on it with its new IP address. This will help avoid connectivity issues in the future.
Using plug & play
The easiest way to find the IP address of an instrument or a number of instruments is via plug & play. It should work under the following circumstances.
The instrument firmware is at least at version 0.7.0.
You are directly connected to the instrument(s) via Ethernet, or there are only network switches in between. It will NOT work if there is a router or VPN connection in between. Follow steps 1-3 of Connecting to a single module if possible. The IP address you configure for your Ethernet connection should not matter, as long as some IPv4 address is configured.
Now it should be as simple as running the following command in a terminal of your choice:
$ qblox-pnp list
That should give you something like this:
Devices:
 - 192.168.0.3: Pulsar QRM 0.7.0 with name "pulsar-qrm" and serial number 00013_2120_003
Using nmap
qblox-pnp won’t be able to find your instruments across complex networks. For example, it won’t work through a VPN. In this case, the nmap tool can help, although you will need to know which subnet your instruments are on (by default 192.168.0.X) to use it.
Note
nmap will generally find all network devices on a network; it is not restricted to only Qblox instruments! If possible, disconnect all other devices that share the same network, such that only the host PC and the device with the an unknown IP are on the same subnetwork.
To use nmap, follow the instructions for your operating system.
MacOS/Linux
Open a terminal of your choice and run:
$ sudo nmap -sn 192.168.0.*
The output should look similar to:
Starting Nmap 7.91 ( https://nmap.org ) at 2021-01-02 20:16 CET
Nmap scan report for 192.168.0.3
Host is up (0.00029s latency).
MAC Address: 04:91:62:BF:DE:57 (Microchip Technology)
Nmap scan report for 192.168.0.200
Host is up.
Nmap done: 256 IP addresses (2 hosts up) scanned in 13.05 seconds
In this case our device has the IP 192.168.0.3 while the network adapter of our host PC has been configured at 192.168.0.200.
Windows
On Windows we recommend installing the latest version of nmap that comes with a graphical interface (Zenmap).
Visit download section at nmap.org and download the Latest stable release self-installer under the Microsoft Windows binaries section.
Run the installer with default options.
Execute as administrator the Nmap - Zenmap GIU that should appear on your Desktop (or in the start menu)
Type in the Command field
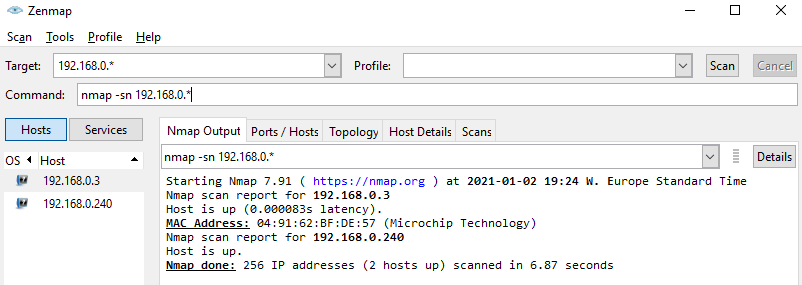
nmap -sn 192.168.0.*and hit Enter on your keyboard. After a few seconds the output should look similar to:

In this case our device has the IP 192.168.0.3 while the network adapter of our host PC has been configured at 192.168.0.240.