Cluster Network and Host Setup#
In this section we will explain how to connect a Qblox Cluster to your host PC. The communication between the host PC and the Qblox cluster is based on the standard client-server SCPI protocol over TCP/IP.
Connecting to a single system#
Note
Please make sure you have completed the steps outlined in the software installation page.
As an example, we will consider a setup composed of:
A laptop (host PC) with an Ethernet port (client),
A Qblox Cluster (server), configured to use the default IP configuration
192.168.0.2.
The following steps will allow you to successfully connect the cluster to your local network:
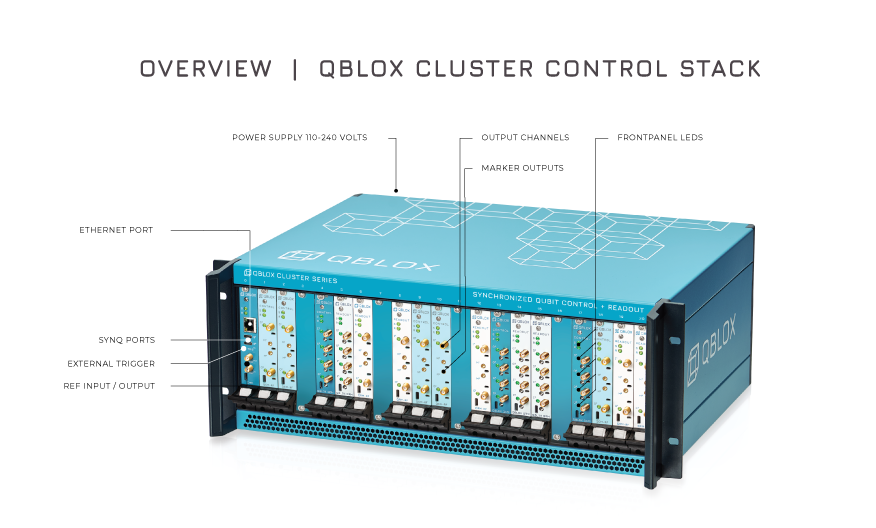
Connect the Cluster to your host PC using an Ethernet cable. For a Cluster, the Ethernet port is located on the Cluster Management Module (CMM), i.e. module 0, of the cluster.
Power up the device. The device is ready when all LEDs are on and no LEDs are red (see Frontpanel LEDs).
Configure the network adapter of the host PC, so that its IP address is within subnet
192.168.0.X(whereXis in a range from 3 to 254). Make sure the subnet mask is set to255.255.255.0. Please see Network Setup Page for more details on how to do so.Common Mistake
A common mistake is to configure your host machine’s IP address to be the same as the device you want to control. This will cause IP address collision and you will not be able to connect to your device. It is recommended to choose a relatively high number in your subnet (e.g.
192.168.0.200) to avoid collisions.Note
Configuration of a network adapter varies slightly between operating systems. See section Network adapter configuration for a Windows, Linux, and macOS description.
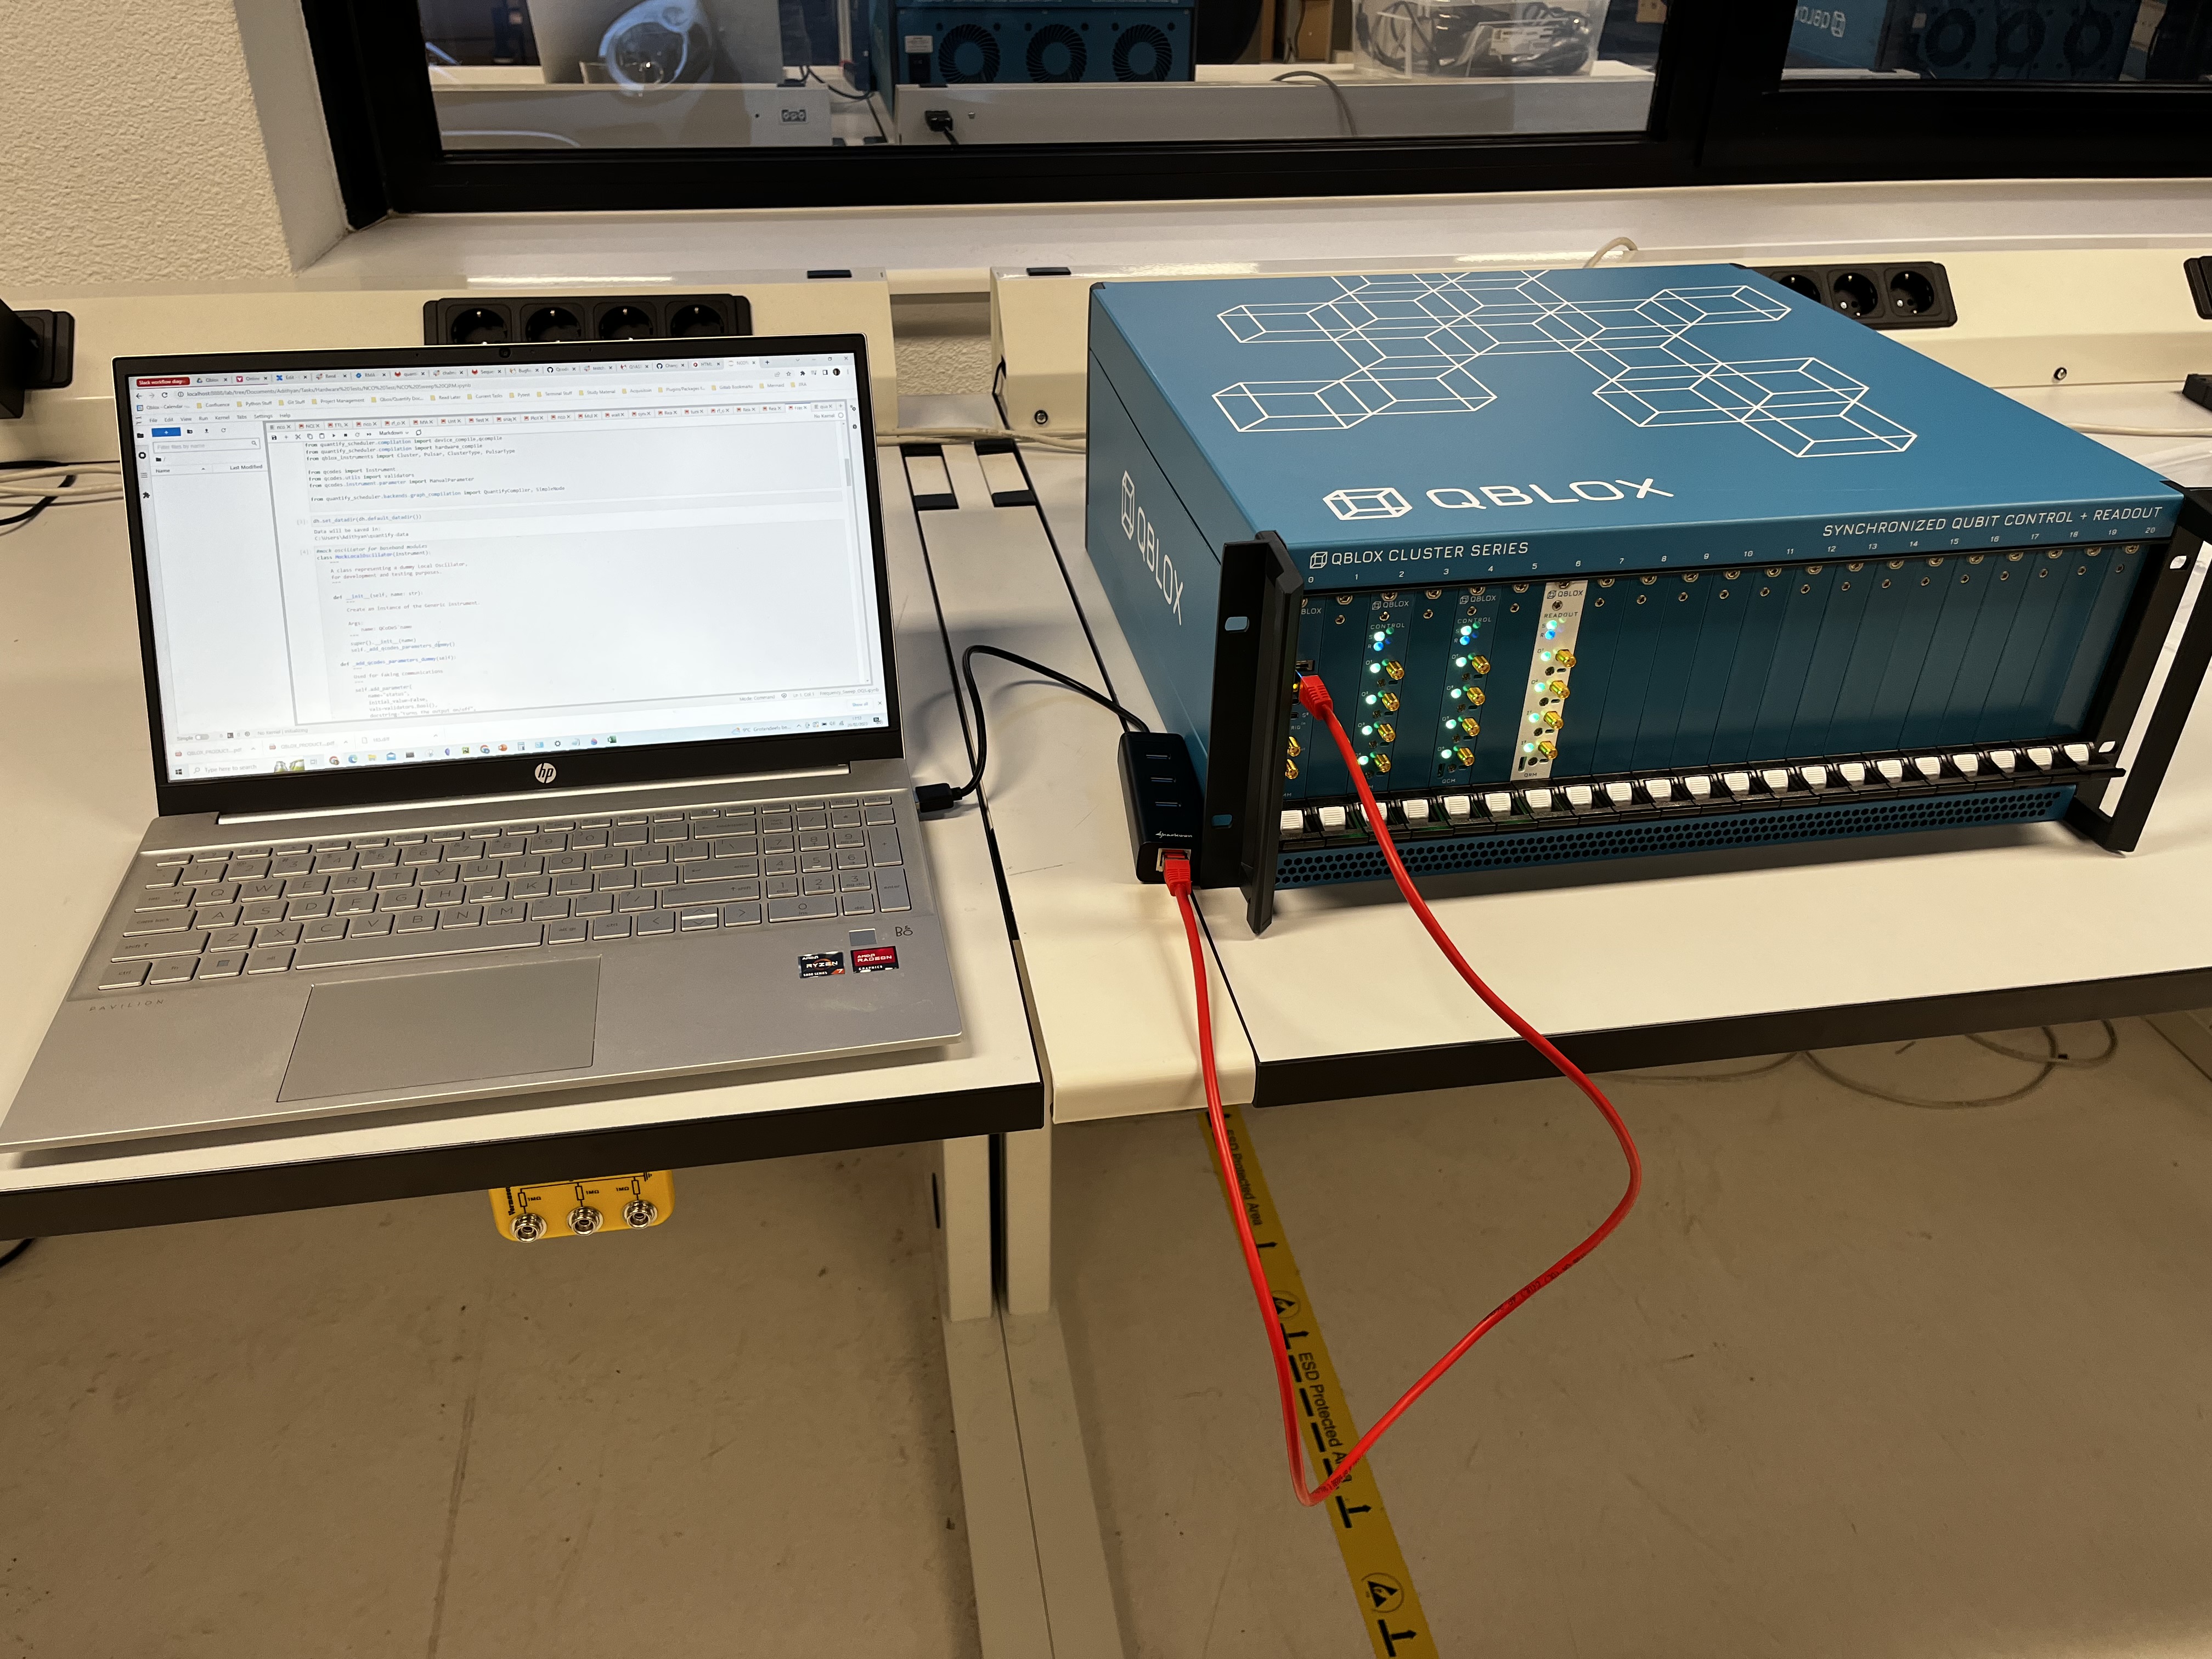
At this point, your setup will look similar to the example setup in the figure below:
After a few seconds, your device should be present on the local network. You can verify this by executing the following command in a terminal of your choice.
$ ping 192.168.0.2 # Press Ctrl + C to terminate the program
Note
The default IP address of the cluster is
192.168.0.2. Replace the IP address of any following instruction accordingly if the IP address of the cluster was ever changed.
See section Finding the IP address of a Cluster in case you do not know the IP address.Finally, connect to the cluster from your host PC by running the following snippet in an interactive quickstart\software\python shell or Jupyter Notebook:
# Import driver
from qblox_instruments import Cluster

# Connect to cluster
cluster = Cluster("cluster", "192.168.0.2")
cluster.identify()
You should now see the front LEDs flashing red for some time.
Tip
Close the connection to the module using cluster.close().
To verify that you are connected to the correct instrument, please see Verifying which instrument you’re connected to below.
Note
The Frontpanel LEDs provide a quick way to check the status of your instrument after connection and during experiments. In case of an unexpected LED color, please refer to the /products/troubleshooting.
Connecting to multiple instruments#
To be able to control multiple instruments we need to follow the steps described above, except now:
Instead of connecting a system directly to the Ethernet adapter of the host PC, we will connect all the systems and the host PC to the same network using, for example, an Ethernet switch.
The IP address of the systems must be changed to avoid IP collisions. See section IP address and name for further instructions on updating the IP address of the clusters.
As an example, we will consider a setup composed of:
A laptop (host PC) with an Ethernet port,
At least two Cluster instruments,
A network switch.
The following Python code lets us connect to the instruments in the example setup:
# Import driver
from qblox_instruments import Cluster

# Connect to cluster
cluster_0 = Cluster("cluster_0", "192.168.0.2")  # This cluster uses the default IP address.
cluster_1 = Cluster("cluster_1", "192.168.0.3")  # This cluster's IP address was changed.
Note
When using multiple clusters in your setup, you might need to synchronize the in- and outputs of these participating instruments. See the page Synchronization to learn how to do this.
For clusters in the setup to be synchronized, all clusters need to share the same clock which will be provided by an external source in a star configuration.
Important
It is inadvisable to daisy chain the internal reference of one cluster to the other clusters in the setup.
The reference clock should be connected to the REF in SMA connection of all clusters and the
reference_source() parameter should be set to external. Once all clusters share the same reference clock,
they can be synchronized with each other by connecting them all via the SYNQ cable. This cable daisy chains the cluster
as shown in the picture below. Synchronization between sequencers in connected clusters then works as expected.
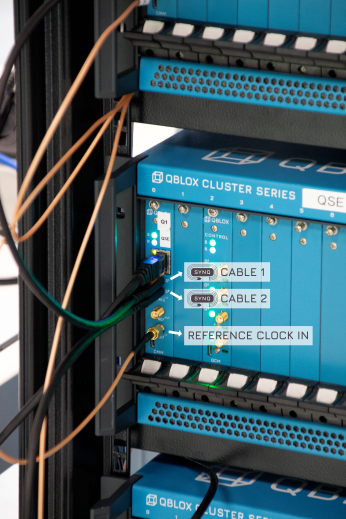
A single Cluster CMM module with an external clock connected and attached SYNQ cable.#
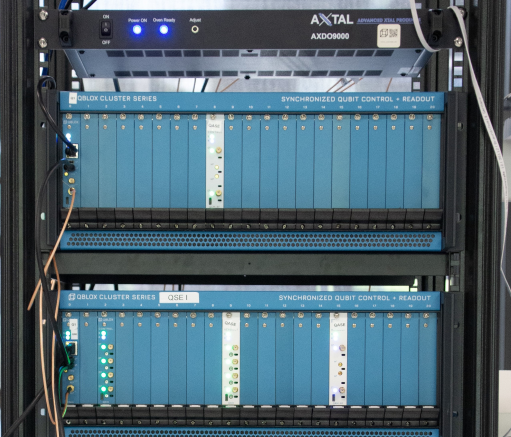
The entire setup is synchronized when all clusters are connected to a common external clock with equal length cables.#
Finding the IP address of a Cluster#
The most robust way to address any instrument connected via Ethernet is to configure it using a static IP address and
then use that address directly. As we’ve seen in earlier sections, Clusters ship with IP address 192.168.0.2 by
default, expecting to be in the 192.168.0.0/24 subnet. However, having to remember IP addresses is not very
user-friendly, and if the instruments are to be connected through an existing network, static IP addresses may not even
be an option: most networks use DHCP to automatically configure the IP addresses of the endpoints connected to it. In
the latter case, ask your system administrator to be sure.
If you have to use DHCP, or just don’t want to have to hardcode IP addresses into your notebooks, you have two options, but both put some requirements on your network infrastructure:
Addressing instruments by their name or serial number using Qblox Plug & Play. This will only work when your PC is in the same subnet as the instruments, which is the case if, e.g., you are in the same Local Area Network (LAN). It will not work if there is a router or VPN in between. You can find all instruments addressable in this way by executing
qblox-pnp list, which will show the IP addresses, names, and serial numbers:
$ qblox-pnp list
Devices:
- 192.168.0.3: CLUSTER QRM 0.5.0 with name "test" and serial number 00013_2120_003
Qblox Plug & Play is also available through its Python API, which can be used as follows.
from qblox_instruments import PlugAndPlay

with PlugAndPlay() as p:
    p.print_devices()
Addressing instruments by their hostname via (local) DNS. This requires DHCP and a router with local DNS support. Note that most consumer-grade routers don’t support this, but enterprise hardware usually does.
These four types of addresses (IP address, name, serial number, and DNS hostname) are collectively referred to as device
identifiers. They are internally resolved via the resolve() function; refer to its API
documentation for the complete syntax supported by it. Both qblox-cfg and the Cluster instrument drivers in Python
support all types of identifiers.
Verifying which instrument you’re connected to#
Once you have a connection, you might want to ensure that you’re connected to the right instrument. You can do this with
the identify() method on an instrument connection object: calling this will make
the module blink its frontpanel LEDs for a few seconds. You can do the same from the command line using
qblox-pnp identify <name-or-serial-number>. Alternatively, if you’re not physically near the instrument but you do
know what its name is supposed to be, you can use the get_name() method to
retrieve it from an open connection.
Renaming instruments#
The Cluster devices come pre-programmed with a default name cluster-cmm. You can change the name using
set_name() in Python, or using the set-name subcommand of qblox-cfg (see
IP address and name). Instrument names may be any single line of characters not including backslashes or
underscores.
Important
Instrument names are case sensitive, so be aware that an instrument named A is different from an instrument named a.
Hostnames have more stringent requirements. They must be lowercase, at most 63 characters long, and besides letters and
numbers only the - (dash) is allowed. If you want to use local DNS, make sure that you configure a name that complies
with these rules to avoid confusion. If you configure a name that isn’t a valid hostname, the instrument will change its
hostname to a best-effort representation of the invalid name.
Note
Name changes go into effect immediately for resolution via Qblox Plug & Play, but the hostname will only change after you reboot the instrument.
That’s it! You are all set to start playing around with the Cluster hardware! We would recommend starting with the tutorials for qblox instruments and qblox scheduler to get acquainted with the Python interfaces for driver and high-level measurement control respectively.